Teaching and Practicing Ideas
Welcome to our Flute Resources page. You will find short videos demonstrating the Phrasing Gestures used in our publications The Flute Scale Book, Flute 102: Mastering the Basics, Flute 103: Mastering the Basics and The Art of Chunking. Weekly Practice Guides for the Flute Scale Book and other Teaching and Practicing Ideas can also be found below.
We hope you will visit often. We would love to hear about any great teaching ideas that you have by writing to us at mail@fabulousflute.com
What is Chunking?
by Patricia George
Chunking is a practice technique in which you play one-inch of notes (4 sixteenths in simple meter, 6 sixteenths in compound meter) followed by a sip breath. Chunking by one-inch is the important thing here.
Why is chunking by four or six notes important? Our brains read in one-inch circles called fixations. Four or six notes is about one-inch. In a fraction of a second, this information or chunk is transported to short term memory. Then the eye hops to the next fixation taking in no information in the hop. This is repeated many times throughout the etude or solo.
Unfortunately, most of us were not taught to read words or music like this when we were children. I understand that elementary schools are now teach reading in chunks as we do in music education.
Try reading the following sentence to get the idea.
In the future (breathe)
I will (breathe)
eat (breathe)
some lunch. (breathe)
As a side note: notice the chunks in our lives: license plate numbers, phone number, credit card numbers, Social Security number etc., so this idea has probably been around for years.
Michel Debost, former professor at Paris Conservatory and Oberlin Conservation, shared with me that when he first studied at the Conservatory, his teacher Gaston Crunelle suggested he practice in small units with a silence in between in learning new rep. Each unit was to be played in performance tempo. On the day before his lesson, he was to put the chunks together and play the piece in performance tempo. Debost wondered why Crunelle insisted on this but decided to give it a try and was surprised at how quickly and how well he learned the music. He continued with this method throughout his career. In later years he shared with me that he had read that these units or chunks stay in the short-term memory for six hours, so if he practiced at 9 AM, 3 PM, 9 PM and then slept (where learning is still occurring), repeating this sequence for five days, he could put all the chunks together and play at an even higher level. Scientifically, I understand that doing this five day routine puts the information in your long term memory. (Science Magazine, Summer 1997 I believe)
I first read about this eye movement in The Musical Mind: The Cognitive Psychology of Music. Oxford University Press, 1985. After reading the book, I decided to start two beginners using this information. I wrote materials for their lessons in one-inch chunks. The beginners’ process was excellent on many levels—they learned to read well so quickly and they sounded even better than beginners usually do. The research I did with them is the basis of our Flute 101: Mastering the Basics.
After watching their rapid progress, I decided to try this technique with my college students. I searched for a book that was basically sixteenth notes for the entire etude and decided upon the Luigi Hugues Op. 101. The students played one beamed group of 4 or 6 notes slurred and then took a sip breath in the rest. (1234 rest, 1234 rest, 1234 rest with the first note being the strongest and then each note getting softer to follow the strength of the beat rule). I had the college students practice four etudes each day for a week—chunking only until they had completed the entire book. They never played the etude all the way through in a regular manner. Within two or three weeks my colleagues (clarinet, horn, violin, viola professors and the conductors of the wind ensemble and orchestra at BYUI) came to me and asked, “What are you doing differently? We hear it in your students!” I explained to them about chunking and I believe all began teaching this way almost immediately. The violin teacher reported back that his students were playing better in tune which is always a good thing. Our chunking book has now been adapted for the clarinet by Boston University clarinet professor Rob Patterson.
Since it takes a while to listen to four etudes chunked, I asked the students to record the four etudes and send the file to me in an email the day before their lesson. They had to promise to not record until the day before the lesson because this exercise is not about understanding the technique, but it is about drilling the technique to retrain music reading in order to coordinate in the best possible way with the way the eye/brain works. We also chunked Chapters 4, 5, and 6 in The Flute Scale Book. These recordings freed up lesson time for more work on repertoire and theoretical technical materials.
After going through the Hugues chunked by 4s the first time, then we moved on to what I call Advanced Chunking. Rather than chunking in 1234 rest segments, we used the Kincaid forward flow gesture: 1 rest, 2341 rest, 2341, rest etc. and progressed into some other patterns. In our Advanced Flute Studies: The Art of Chunking, the Advanced Chunking Techniques are explained. The flutist should drill each new option for several weeks.
What happened in my students’ playing? First by chunking they became better readers. They also played four or six notes on one blow of air which taught them the early steps of controlling a musical line. Also, I was surprised to observe that their tones were better. Why? Well, with each sip breath, they were separating their vocal folds or opening their throats. After you do a page of this (4/4 meter–so four chunked groups per measure times about 40 or so measures is 160 times to practice separating the vocal folds. Eventually they just left them open so the tone was freer.)
Almost all players have remarked that their hands felt more relaxed because the playing and then resting was really like doing something like action and then release. Professional colleagues that I have shared these observations with love the way their fingers and hands feel after chunking a few pages. What a benefit!
I was happy that I selected the Hugues Op. 101 because in the 40 exercises it drilled most of the major and minor keys. In the Art of Chunking we transposed a few so there would be exercises in all the major and minor keys. Hugues was a master of writing scale like passages as well as using the compositional technique of sequencing. This material offered the opportunity to identify the sequential material. This type of writing develops the technique in the player very quickly. And, of course, any scale is a good scale to practice.
If you want to read a good book about chunking in other settings, try The Talent Code by Daniel Coyle. I loved when he discusses the practice technique being used at Meadowmount—an elite summer program for string players. The saying goes—if someone walks by your practice hut and can tell what you are playing, your chunks are too big!
Video Demonstrations of Vibrato
Patricia George had the opportunity use a flouroscope in order to demonstrate what is happening inside of the mouth while playing the flute; particularly while articulating and producing vibrato. Fluoroscopy is an imaging technique that uses X-rays to obtain real-time moving images of the interior of an object.
One of the problems in doing this kind of work is how to position the flutist in the machine. In the past they had tried to have the flutist face the tech person; however, the bones of the spine were so strong in the images that all the soft tissue areas were not visible. When a colleague saw her playing left-handed flute, he wondered if she would fit in the fluoroscope sideways. It worked pretty well; however, everything on the flute from the G# key on down was outside the machine. So, she had to stand where she would be basically in the center of the screen—and still be able to play. Not the best playing position.
She was in the fluoroscope for three minutes. That was all the time that was deemed to be safe. The fluoroscope demonstration of vibrato was done in October 2004, compliments of the Madison Memorial Hospital in Rexburg, Idaho.
Video #1 – click here
1. Slurring from middle to low, low to middle, middle to high and back–all three octaves
2. Single tongued (T) in all three octaves with vibrato
3. K in all three octaves with vibrato
4. TK (thicka) in all three octaves with vibrato
Video #2 – click here
Vibrato in all three octaves
Video #3 – click here
1. Light in the tunnel exercise for vibrato placement. First, I placed the vibrato outside me on a music stand, then at the lips, upper pallette
or behind nose, back of mouth, in the throat and finally in the chest. By placing, I mean “thinking” the vibrato in that place.
2. Two multiphonics—the one from a G and an Ab fingering
3. Four note slurs
Video #4 – click here
1. Faure Fantasie, Op. 79 – opening of slow part
2. Faure Fantasie, Op. 70 – opening of fast part
Video Demonstrations of Phrasing Gestures
THE FLUTE SCALE BOOK: A Path to Artistry
Video Demonstration of Phrasing Gestures in Chapter 2:
Phrasing Gestures 1: Down/Up (2 notes)
Phrasing Gestures 2: Down/Up (4 notes)
Phrasing Gestures 3: Down/Up (8 notes)
Phrasing Gestures 4: Forward Flow (2 notes)
Phrasing Gestures 5: Forward Flow (4 notes)
Phrasing Gestures 6: Forward Flow (8 notes)
FLUTE 102: Mastering the Basics
Video Demonstration of Phrasing Gestures:
Down/Up (4 notes)
Forward Flow (4 notes)
FLUTE 103: Mastering the Basics
Video Demonstration of Phrasing Gestures:
Down/Up (4 notes)
Forward Flow (4 notes)
ADVANCED FLUTE STUDIES: The Art of Chunking
Video Demonstration of Phrasing Gestures:
Down/Up (4 notes)
Forward Flow (4 notes)
Weekly Practice Guides for
The Flute Scale Book
by Patricia George
Level 1 – Curriculum guide for teachers and practice guide for
industrious young players.
Level 2 – For advanced players of all ages – A guide to realize your
flute playing New Year’s Resolutions.
Click link below to download each lesson.
Lesson #1
Practicing and Teaching Ideas
by Patricia George
Quick warm-up
A great way to warm-up quickly and start each lesson (no matter the age level) are the left hand harmonics exercises on page 3.02 in The Scale Book: A Path to Artistry. This exercise requires fast air and reminds the students to keep their lower lip flexible. Holding the barrel with the right hand increases the benefit by placing the headjoint firmly in the chin.
The Flute Scale Book
- The first chapter features one octave scales in whole notes. Not only is this great material for the young player, but can be used for tone and tuning material for the advanced player. One of my favorite things to practice is one octave scales, slurred, up and down at least 8 times, 12 times or more. It is a more advanced idea than the five note repetitions we have all been doing for so long.
- Choose only one key and play everything in the book in that key? It only takes about an hour to do it and you have a complete workout.
- To make your trills sound better, play a “nano” second of the written note before you begin the trill.
- Next in The Flute Scale Book is a terrific circle of fifths designed by Phyllis Louke. Not only does it show the key pairings but it also indicates by the position on the circle (think clock) how many flats or sharps are in the key signature and then how the key signature is set up on the staff. There are also clever mnemonic devices to help remember the key pairings.
- One of the features of the book is on page iv–Introduction to Scales. So many students today do not have a piano background so we inserted a one octave keyboard. This keyboard should help you show the student what 1/2 and whole steps are. Also there are drills to help you teach major, minor, whole tone and gapped scales. I think it is a winner. It is good for enharmonic study too.
- As you begin to practice through the book, notice that most exercises start in the key of F. The key of F is a much better key in which to balance the hand. By the time you get to C, C will be a breeze because your hand is balanced.
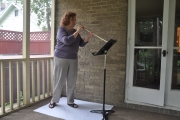
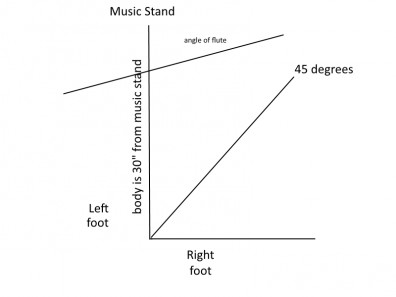
- Check out the feet on page iii. Dr. Susan Fain generously allowed us to use this illustration from her dissertation. Don’t you love the splayed toes? Left foot at 12:00 and right at 3:00 and then adjust to make it comfortable. Body will be 45 degrees to the right and the head will turn to the left (facing the stand) so that the flute will be parallel to the stand.
There are three parts to every note
There are three parts to every note: the beginning, the middle and the end.
• The beginning is concerned with the attack. Do not chip the
beginning of the note. Remember the tongue releases the air.
• The success of the middle of the note will have to do with even air. Use a tuner and keep the needle still.
• The end of the note either stops with the air or is tapered. Mariano
used to talk a lot about the end of one note may be the beginning of
the next note.
There are three parts to every note
There are three parts to every note: the beginning, the middle and the end.
• The beginning is concerned with the attack. Do not chip the beginning of the note. Remember the tongue releases the air.
• The success of the middle of the note will have to do with even air. Use a tuner and keep the needle still.
• The end of the note either stops with the air or is tapered. Mariano used to talk a lot about the end of one note may be the beginning of
the next note.
Vibrato
-
- Vibrato cycles are influenced by the style period, genre of the composition, individual composer, timber and texture. A good piece of advice: when playing in an orchestra, watch the concert master and imitate his vibrato speed.
- Also: there are two kinds of vibrato: tutti and solo. If you are playing with a section and you are playing the same music, tone the vibrato down. It you are a soloist, then you can let it out more.
Left Hand Thumb
When removing the left hand thumb, do not let the flute roll back. If it does, you will be flat.